What has always intrigued me with some of the new functionality of Sitecore 8’s Federated Experience Manager is how content is pushed to other sites. This post will explore this concept.
Following on from my first post regarding capturing analytic information from non Sitecore sites, I wanted to see how easy (or difficult) it is to add content to external sites
For this, I will set up a basic Title and Text component and see how we can utilise this rendering on a non Sitecore site. The site I’m going to add this too is the basic default ASP.NET MVC site I configured in part 1 – it is important to point out that the technology behind the site really doesn’t matter (which is cool in itself!)
Setting up a Rendering Component for this test (ascx)
Just to briefly show how the component is set up, below is the markup:
This file contains bidirectional Unicode text that may be interpreted or compiled differently than what appears below. To review, open the file in an editor that reveals hidden Unicode characters.
Learn more about bidirectional Unicode characters
| <div> | |
| <h2> | |
| <sc:Text runat="server" Field="Title"/> | |
| </h2> | |
| <sc:Text runat="server" Field="Text"></sc:Text> | |
| </div> |
One observation I made when testing this was that the component itself needs to be surrounded via a containing element. Beforehand, my component didn’t contain a surrounding DIV and all that was being rendered was the H2 – so ensure that your component has a containing element and you should be fine.
Below is the Datasoure Template used for this component:
Now, if we open up the Federated ExperienceManager, click on our site and click the “Open in Experience Editor” button, you will open the external site in the Experience Editor ready for personalising.
You will notice that on the Ribbon there is a botton marked “Add Placeholder”. This will allow you to provide an anchor point on the page where the components can be inserted.
When you click onthe “Add Placeholder” button, you’ll notice that all other buttons are grayed out. What you can do now is to click on any element from within the page and a list of options will appear.
Notice that the selection will display the element that you want to interact with, the “up left” arrow allows you to fine-tune your selection to ensure that the correct element in the DOM is selected.
You will also have three options:
- Add Before – allows you to add a component before this element
- Replace – Replace this element entirely
- Add After – Gives you he option to add components after this element
In this experiment, I’ll select “Add before” and give the placeholder then name of “promo-panel” and select “Test Site” as the parent element.
Now that we have a placeholder on the page we can select this placeholder to insert our Title and Text component
From this point, you will have the same level of functionality as the standard Experience Editor – so add your component (in my case the Title and Text component and associate a Datasource with it in the standard manner
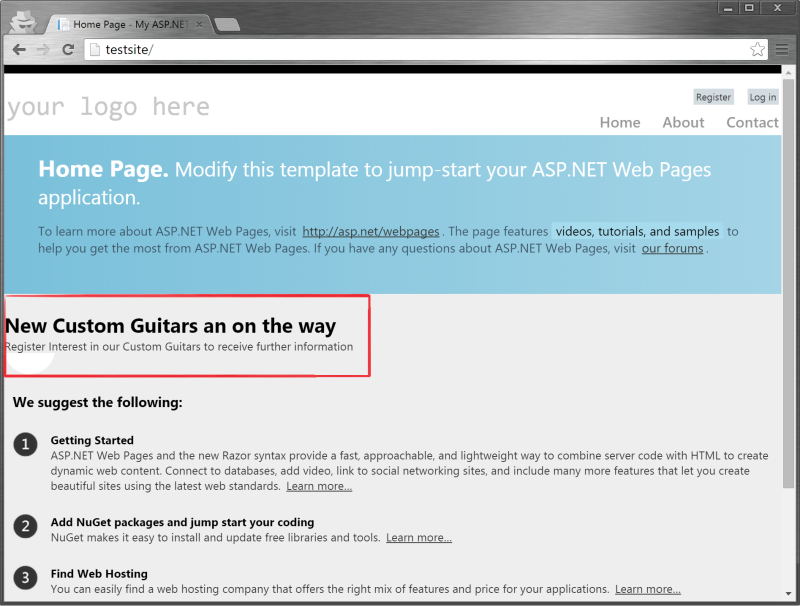
Once this is done, publish the changes. Now let’s look at our site:
As you can see, our new component is being rendered onto the page of our non Sitecore site. Pretty clever eh?
How does this look in Sitecore?
Lets inspect the backend of Sitecore and see how this is acheieved. The settings for this are stored in /sitecore/system/Marketing Control Panel/Federated Experience Manager
You’ll notice that our “promo-panel” Placeholder is here. Let’s have a look at that:
You’ll notice that there is a Selector field. This indicates exactly where in the DOM to insert the content – and the above “Position” field signifies to insert content before this selector.
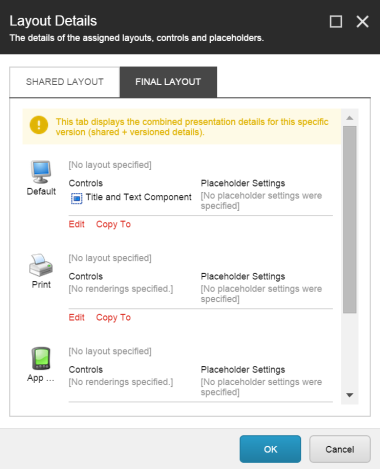
Now all that’s missing is “what” is inserted into this Placehlder. This is defined in the Presentation Details of the Placeholder:
Pretty clever stuff eh? 🙂
From here is should also be possible to provide Personalisation and DMS based rules to the Presentation in the same manner as any other Presentation in Sitecore. I’ll be looking to explore this in a future post.
Hope you have fun with this.


